
One of my favorite things is to take the images I captured from my camera and put them in a workflow through two or three different photo editing applications. I find it most satisfying to pull out the digital information within an image to improve its impact or simply bring it to look as I envisioned when I took the shot.
For today’s challenge, please feature three or four images in your gallery that you tweaked for whatever reason as well as the original image straight out of the camera. The edits don’t have to be massive, maybe just cropping to remove unwanted items or reformatting the image size. Or perhaps you made significant edits to create what I like to call an altered reality where you removed or replaced components in the image, changed the color or tone, or otherwise created an entirely different look to the image.
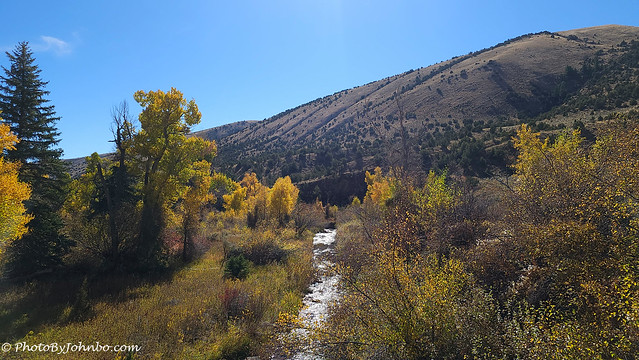
My opening photo is the final edit of a view captured during a drive through Flaming Gorge National Recreational Area in Utah. Our timing was perfect, and the autumn colors were spectacular. The backlit scene underexposed the trees in the foreground. I used Luminar Neo’s Develop module to reduce the highlights that overexposed the stream, then tweaked the Enhance AI tool. That control usually brings up the exposure in the foreground. The adjustment returned the intense yellow leaves translucent in the bright sunshine.
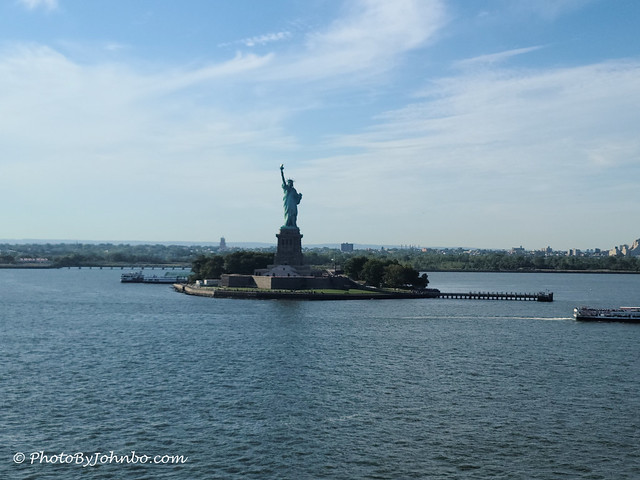
On our fall Canadian cruise out of New York, we were pleasantly surprised to pass Liberty Island and Lady Liberty on our sail down the Hudson River toward the Atlantic Ocean. Again, a strong backlight puts the subject in the shadows. Given the subject and the harsh midday sun, I decided an alternate reality would set the image apart from the many other shots captured by cruisers as we passed the iconic symbol.
Skylum Software’s creative asset membership includes a monthly selection of skies and presets. I don’t use presets much, so I don’t download them, but I usually download the sky packages. I selected a late golden hour sky with the sun on the right. As the light hitting the island was from the left, I flipped the sky to place the sunlight more realistically.

Not entirely happy with the result, I returned to the image and reworked it. This time, I cropped the image to get closer to Liberty Island. I selected a more subdued sunset with a more pastel shade of gold. I used the Relight option in the sky replacement tool to add warm tones to the sunlight on the statue and the left side of Liberty Island. Another improvement with this sky is that the brightest part looks to be placed more to the left, giving a more accurate light source direction than on my first attempt.
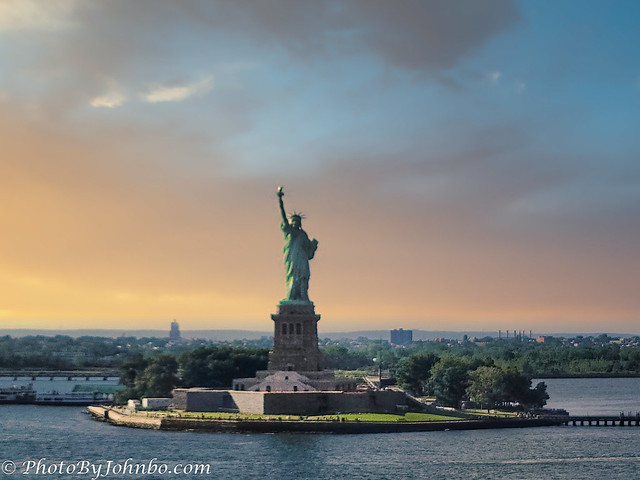
I’m curious to know which of these two alterations is better. Feel free to comment below. You also won’t hurt my feelings if you tell me you prefer the original over the versions with an altered sky.
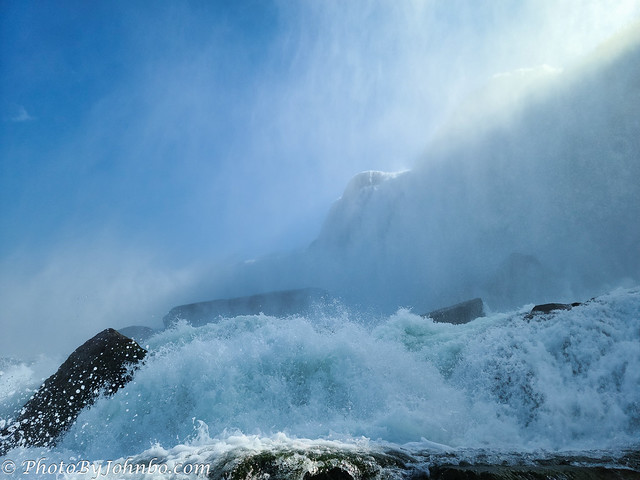
Moving to western New York, we visited Niagara Falls. We sampled most of the attractions available to visitors on the United States and Canadian sides of the falls. I chose to share a view from the Cave of the Winds attraction. Though the cave is no longer there, visitors ride an elevator down, don rain gear, and exit to an area below Bridal Veil Falls. From there, a wooden staircase with several levels draws guests higher and closer to the rushing water. The upper deck is the Hurricane Deck, where you can be sure you will get thoroughly sprayed with the mist from the falls.
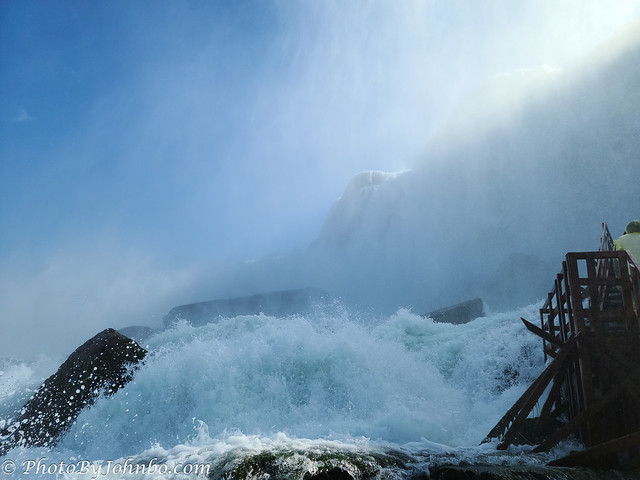
I decided that the partial view of the decking was distracting from the majesty of the falls. I sent the image from Adobe Lightroom Classic to Adobe Photoshop to use Photoshop’s Generative Fill tool to remove the part of the wooden structure covering about 15 percent of the image. I also reduced the highlights from the strongly backlit sky and increased the contrast slightly. I was careful with that adjustment, though, as that tool also removed some of the haze created by the mist. Photoshop added a sharply defined rock in place of the decking.
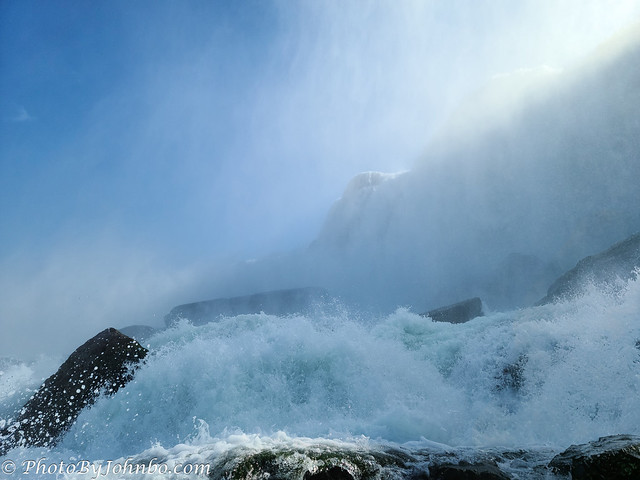
I also tried a second version of this photo to compare Photoshop’s Generative Fill with Luminar Neo’s Gen-Erase module. Neo’s version of the altered reality also replaced the deck with a rock, but the AI software put it further in the background, partially obscured by the mist. Gen-Erase also modified the foreground directly in front of the decking it removed.
For a closer look at these images in 2K HD, you can check out my gallery on Flickr here. Last week, Sofia challenged us with Water in Motion. I could have used this edited image in that gallery but decided to use it here instead. Next week, Donna of https://windkisses.com/ will host the challenge. You can find more information here if you want to join the fun.
John Steiner

Very nice edits, John! 👍🏻😊
Thanks, John!
You’re welcome. 😊
These are lovely edits, and I liked the The final version of Lady Liberty and hotoshop’s Altered Reality View of Bridal Veil Falls. But the original version of Flaming Gorge Recreational Area, as I like rather strong contrast of colors. But all beautiful examples. As I love editing this is a theme close to my heart.
Thanks, Ritva!
[…] will go straight to what John wrote” One of my favorite things is to take the images I captured from my camera and put them […]
https://sillarit.com/2024/04/06/lens-artists-challenge-294-before-and-after/
John, your created some amazing images with your edits. I like the final version of Lady Liberty and the Photoshop Altered Reality of Bridal Veil Falls. Thanks for this challenge.
I am looking forward to seeing your response, Beth!
Wonderful what you have done here!
Thanks, I.V.
I really like your final Statue of Liberty. A bit of fantasy is no bad thing to elevate her from a mediocre shot. And I like your first edit of the falls, John 🤗💙
Thanks, Jo!
[…] quote and his inspiring challenge, Before and After, had me thinking about my commitment to photography and/or editing. I would like to think that […]
[…] and the ways we might address them. Be sure to visit and link to his terrific original here, and to use the Lens-Artists Tag to help us find you. Thanks also to Sofia for her beautiful Water […]
A wonderful, and thoughtful challenge, John. Your post always bring us something we learn and take away to make our photography journey better. Loved your explanations and all your photos, even the originals, lol. I especially loved the Statue of Liberty. What a great model.
Lady Liberty is always there posing for tourists. What a patient lady! >grin<
Isn’t that the truth.
A fun challenge John – always great to see what editing can do, especially with the new AI tools. Your Lady Liberty is a terrific example and is the use of different tools to edit the falls. Excellent post and challenge.
Thanks, Tina! My biggest challenge is to not take my edits “over the top.”
[…] Posted for John’s Lens-Artists Challenge […]
I’m always impressed with the quality of your editing, John and I’ve said it before, I also enjoy the way you explain how you do it. I’m nowhere near your level 🙂 The photos you picked for this challenge are perfect examples of just that and I’m sure you will inspire a lot of us to be a bit bolder.
Here is mine:
Thanks, Sofia. Feedback from our community of photographers who participate in these challenges have led me to be more descriptive in discussing my edits. I know that not everyone cares to read about the technical details, so I try to just keep the descriptions to a minimum.
Hmmm. Inscrutable, little grasshopper. 🤔 My mind is boggled! 😱 Excellent.
Your comment takes me back to a show I loved to watch. 🙂 Thanks, John.
[…] — Lens-Artists Challenge #294 – Before and After […]
I like this challenge. Your editing for the Bridal Veil Falls is great. The result is much better.
Thanks, Roland! I have as much fun editing as I do taking the image in the first place!
[…] lens-artists photo challenge […]
hello john
a very interesting and wonderful theme that you have chosen for the challenge, I really like it.
your pictures are excellent i like them very much, especially the 3rd and 4th.
here is my contribution to the theme, https://wp.me/pfnz9O-fO.
many greetings robert
Thanks, Robert! I enjoyed looking at your edited images as well. Your black-and-white and the opening color image are my favorites.
thank you so much john for your great comment and i’m glad you like the pictures.
many greetings robert
[…] colleague was amazed after seeing before and after […]
John, you are truly a master! These edits are superb. It was great to read your thinking about the sky replacement, for example. The choices you made are beautiful. I especially liked the generative erase in the Bridal Veil Falls. I liked Neo’s version of that image because it did not create as much of a distraction as the rock in PS. Great gallery! Here are three photos I edited for the challenge:
https://egidio.photography/from-bland-to-bold-photo-makeovers/
Thanks, Egidio! I’ve been using both Gen Erase and Generative Fill lately to fix some minor flaws. They both are much better at fixing small boo boos. 🙂
[…] was what John wanted us to show for this week’s Lens Artists Photo Challenge – how we process the photographs. I am so thankful for the advancement in the softwares on […]
I am not surprised that this challenge comes from you John 😀, the master of editing that you are. Great edits and I must say, great patience to make those!
My entry is here, with comparatively simple edits in the pictures :
Thanks for the nice compliment, PR!
Lovely edits John and a great topic.
Here is mine https://wanderingteresa.com/before-after/
Thanks, Teresa!
[…] challenge is from Johnbo, the before and after of photo […]
Nice edits! I really enjoyed your edits in Lady Liberty.
I could edit a picture all day. I love the whole process.
I so enjoy the process of thinking about what, if anything an image needs. On a rare occasion, I’ve discovered I just screwed up a perfect shot. If it ain’t broke, don’t fix it. >grin<
[…] This is my submission into the two hundred-and-ninety-fourth Lens-Artists Photo Challenge. The theme for this one is “Before and After“. […]
[…] [The Lens Artists Challenge is hosted this week by Johnbo.] […]
Nice to see your adjustments here. Gets across the process and makes one think about perception.
Here’s mine for this one: https://stupidityhole.com/2024/04/07/sydney-photo-test/
[…] Lens-Artists Challenge #294: Before and After […]
[…] John from Journeys with Johnbo has given us this week’s challenge of presenting images straight out of the camera with the edited, or tweaked, version. […]
Whoa! I definitely enjoyed your edit of the Statue of Liberty (before the crop).
Thanks, Khürt. Sorry for the late comment. For some reason, your comment ended up in my spam folder.
[…] John is hosting a great challenge this week. He’s inviting us to show how we process several photos in his Before and After chalenge. My workflow is always evolving. Up to now, I’ve been exploring the capabilities of Photoshop and Nik filters. But after this challenge and John’s inspiration, I expect I’ll move on to Lightroom and several new filters. […]
[…] interesting challenge this week, before and after. This is John’s, from Journeys with Johnbo, challenge to us this week. It is also something I’ve done […]
[…] Sunday! This week, we are heading behind the scenes on a few photos of mine as I show you the before and after edits in this week’s Lens-Artist Photo Challenge #294, hosted by John of Journey with […]
Great challenge John and I appreciate how you explained and showed the edits. I use very few tools, partly being lazy and not wanting to buy and learn fancy software. I love the changes to the Statue of Liberty and might even prefer it somewhere in between version two and three.
Great post, John, and wonderful theme for this week. Your explanation of your workflow is really interesting and eye-opening. You clearly know and experiment with different filters/tools, some of which are new to me. Thanks for enlightening all of us! I really enjoyed the Niagara sequence. My favorite is the Photoshop version. My favorite for Lady Liberty is the 3rd cropped image. You really nailed it!
Here’s a link to my post: https://pilotfishblog.com/2024/04/07/lapc-294-before-and-after/
Thanks, Patti! I really enjoy the editing process.
It shows, John. Great job.
[…] here and here […]
[…] you John for the invitation to explore the editing process of these spring […]
[…] the streets today, there are still these metal barriers behind which the city changes. There is no before and after, only here or […]
I love the technical wizardry that you want us to explore this week, and you have some wonderful examples. I love that version of Liberty that you created, and I like the altered realities of the other photo as well.
While I appreciate this, I don’t do such heavy editing myself, and prefer to leave such manipulations to my camera automation (there’s no escaping that today). So I’ve taken the liberty of reinterpreting your theme in a totally mundane way: https://anotherglobaleater.wordpress.com/2024/04/08/perpetual-motion-machine/
I noticed your take on the challenge earlier, and there is nothing mundane about it. Thanks for joining in.
[…] I reckon are fair game and I rarely mention them. But this week John asks us to share those ‘before and after’ images, and to explain what we did to change them, and how. I thought I would take five shots […]
Very interesting to read about the various tools you use to create these images, especially the AI which I haven’t tried. I agree with you that the decking in the falls shot is distracting – I would probably have tried my clone tool to remove it, in the absence of an AI one, but these versions must be quicker and probably neater!
As you know, I also enjoy editing so this was a great challenge for me. Here’s my contribution: https://www.toonsarah-travels.blog/before-and-after-in-mexico/
Great challenge John, YOu have done some great things to your images. Love what you did with the Statue of Liberty.
A great challenge John! The like your lady Liberty’s edit a lot!
Thanks, Aletta!
[…] For today’s challenge, please feature three or four images in your gallery that you tweaked for whatever reason as well as the original image straight out of the camera. The edits don’t have to be massive, maybe just cropping to remove unwanted items or reformatting the image size. Or perhaps you made significant edits to create what I like to call an altered reality where you removed or replaced components in the image, changed the color or tone, or otherwise created an entirely different look to the image.John Steiner […]
[…] LensArtists Photo Challenge: before and after […]
https://wordpress.com/post/100countrytrek.com/23815
Thanks John for your an amazing images . Anita
You are a true master of this, John, and now – we will all give it a try! I always learn much from your explanations of how you do the editing, but I am afraid I have a long way to go… Love your last Lady Liberty, and the AI use on the Bridal Veil Falls was great. A top notch challenge!
Thanks, Anne-Christine! I really enjoy the process of editing.
I would think so!