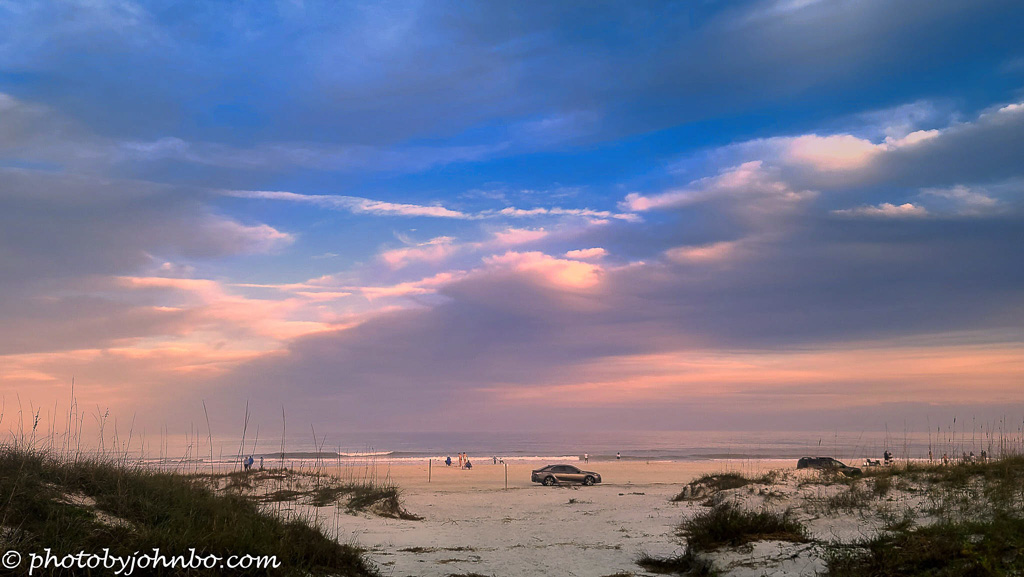
Regular readers know that I am a fanboy of Luminar Neo. I was pleased and surprised with some of the program’s additions released at a 1.xx update on April 25, 2024. Version 1.19 features several enhancements, and as I write this, I am sharing some of the results of the enhancements. I start with the Twilight Enhancer tool. This addition provides a toolbar with several enhancement options that turn a daylight sky into twilight. I may have overemphasized its use here. A percentage slider can be adjusted from 0 to 100 percent to reduce or magnify your final settings.

Except for the opening image, I’ve selected photos that I haven’t published before. I used them to see if the new tools could “rescue” rejected images. I’ll leave it to you, dear reader, to decide if the new tools were helpful in the rescue, or if the image should have continued to be unpublished. >grin<

One of the reasons I’ve kept Adobe Lightroom Classic in my arsenal is its ability to process bracketed images into HDR (High Dynamic Range). For quite some time, I’ve grouped the brackets into sets and used Lightroom’s HDR Merge function to blend an entire collection into separate HDR files. Neo includes an HDR tool as an extra-cost option but I haven’t used it much due to my opinion that it’s a bit heavy-handed in its output. Version 1.19 adds batch processing ability to merge up to 1,000 bracketed images into the requisite number of final HDR images.
The image above is a bracket merge before final processing. Since the batch function uses the same merge tool, the resulting output needs to be “toned down,” in my opinion. The image below is an example of the same scene batch merged from Adobe Lightroom Classic.

As you can see, both images need to be tweaked. I prefer to start from the Lightroom version as it needs fewer tweaks to finish processing, so I will continue to use Lightroom’s merge function.

While on our Panama Canal cruise in 2023, one of our excursions included photographing us with a scarlet macaw. The photo was never published for two reasons: first, I don’t often share photos that I haven’t taken myself, and second, the background was somewhat distracting.
Luminar Neo has had a background removal tool in its portrait module for some time, but using its masking function has been a bit tricky. With the new Object Select mask, the program is much better at determining a subject. I expected that the mask wouldn’t include the parrot, but you can see a screenshot of the Object Select mask below.

The Object Select mask generated wasn’t quite perfect, but fixing it by adding and subtracting areas of the image was much easier than with the previous version of the background removal tool. The specific areas I tweaked were adding back that “shark bite” out of my side below my arm and restoring the curve at the bottom of Lynn’s hat. A brick wall behind her wasn’t completely removed from the mask, and the area just above my extended shoulder didn’t get completely removed. A few strokes from the brush tool resulted in a clean mask.
To complete the image, I added a background layer featuring a colorful background with light flares. The edges of the mask had some minor haloing in a couple of spots, so I brushed those areas with a 50-percent darken from the dodge and burn tool to remove the edge highlight.

This image was rejected due to the very bright background and dark subject. After using the new Luminosity tool to knock down the highlights in the background, I wasn’t satisfied with the results, so I deleted that edit and started over with the Object Select tool. That worked out much better. To mask the subject, I clicked the body of the duck and the mask generated is shown below.

The mask stopped at the duck’s neck, probably because of the stark change in shade from the body color to the mostly white neck. The tool also missed a tiny area of the body by the branch in the foreground and the edge of the body on the right side of the photo.

I clicked on the duck’s head, and the mask tool filled out the rest of the duck. It missed the tip of the beak and had some shading in the area between the neck and the head feathers. Switching to the brush tool, I cleaned up the area behind the neck and added those areas on the body that were not selected. I then inverted the mask and lowered the exposure of the background and other objects around the duck.

I’m not sure I can say that I “rescued” this image. Attempts to increase the exposure on the duck above what I was able to achieve with this edit resulted in an over-processed look. Still, the final image is definitely an improvement over the original.

Version 1.19 added a luminosity mask to the toolkit. I tried it with the duck image, but though it picked out the highlights and reduced them, my lack of skill with the tool led me to use object masking on that image, instead.
For this image, though, the luminosity mask was helpful in reducing the bright white areas of the mountain lion’s fur. After cropping the image to a square format, I set the range of the luminosity mask to highlight only the brightest fur. The overexposure washed out the detail leaving a white mass that wasn’t recognizable as fur. Bringing down the highlights brought out the detail, something I could have done without using the luminosity mask. What was most useful is that the mask was also applied in using the Structure tool. Applying structure only to the whitest areas of the cat’s fur helped to restore the detail on the chest to match the detail in the animal’s properly exposed fur.

The final tool I am showcasing in this post is the new Water Enhancer tool. This view of the Red River of the North near our home in Fargo was rejected due to the brown water on that day. The enhancer tool did a decent job of recoloring the water to a more appealing shade.

The tool is quite versatile with several sub-options to manipulate the shades of blue or green. As this location on the river is only a few miles from our house, I chose to return later in the spring when the water was running blue again. Those were the shots I published in an article about the park that borders this part of the river. If I couldn’t have returned, and this day was my only opportunity to photograph the river, I’d have been happy with the images I captured after using this tool… well most of them, anyway.

This image was captured a few days before the previous photograph when the water was even more brown. Using all of the options, there didn’t seem to be any combination of settings that didn’t make this image look over-processed. Any attempt to reduce the effect of the Water Enhancer tool resulted in a return to the look of the brown water.

In fairness to the tool, maybe I haven’t yet learned how to use Water Enhancer to full effect, but based upon my first attempts, I think the tool can be helpful in many situations. I’ve seen some YouTube videos where other photographers have demonstrated how the tool was used to rescue their rejected water photos. As I gain expertise, like the Twilight tool, I may find some applications that will help bring out an artistic view of a less-than-idyllic image.
Overall, I plan to use several of these tools regularly. The Object Select will probably be my most useful addition, and when I get more experienced with it, I can see that the Luminosity Mask will be very helpful. For those who like to pixel-peep, you can view all of these images on my Flickr site here.
John Steiner

You obviously enjoy playing, John, and I can certainly see the benefits but I don’t have the skills or the patience. Good to see what can be done though.
I do enjoy using the tools to improve my photos. Most of the time, I don’t go to extreme steps to rescue images. Typically, I spend less than a minute or two in fixing an image.
Lots of interesting developments happening in luminary products!
You have tons of patience, and, doing a great job, John.
Congratulations 👏 🎉
Thanks, Philo. I enjoy working with new technology… well, er, ah, sometimes. >grin<
And in the process you spread the knowledge by your teachings and experiments.
We are fortunate
Thank you for the kind words.
You are welcome, John.
I know you’re a fan of Luminar Neo and you’ve demonstrated its usefulness here but I confess I still can’t get on with its workflow so use it only rarely.
I know what you are saying. That’s precisely the same reason I spend so little time in Photoshop. 🙂
You certainly enjoy a challenge John. I don’t use Luminar because of my early experience with the program and company. I’m glad to see that they have improved in both areas.
The program is much improved from the first release of Neo. It was frankly released too early, but they were already past their deadline.
I am glad I stuck with them. The software is so much simpler than Photoshop for me.
I tried it before Neo came out. I don’t use PS except for the spot healing brush and filters. Lightroom has come a long way with masking capabilities.
Indeed Lightroom is much more powerful than it used to be. It’s new masking works quite nicely, but I’m not that experienced with it as I tend to ship my images to Neo.
I do need to spend some more time with masking in Lightroom. When it was first released, I had a lot of trouble adding to a mask. I’ve since either learned how to do it, or they’ve improved what they first reseased. >grin<
😊
John, I have also been experimenting with those new tools. The TwilightTool is by far my favorite along with the Object Tool. Have you figured out how Neo determines when the tool is activated? I thought it was reading the EXIF data for the time the photo was captured. These are excellent photos and great edits.
Are you referencing the Twilight Tool? If so, I just activate it by adjusting the percentage slider. Maybe I’m not understanding the question. If not, send me an email and we can take the question offline.
Yes, the Twilight Tool. What I meant to say is that the slider is not always movable. I am wondering if Neo needs to detect some color to trigger the option to use that Twilight Tool.
I tried a few photos this morning. It always worked for me whenever there was sky that it detected in the image. I tried a couple of images that had light background interiors that could be mistaken for sky, and the slider didn’t work.
Could it be that the images you tried didn’t have enough sky for it to detect?
You make a very convincing case for Luminar Neo. I can’t get over the transformation in the sky in the first image and the duck. Fantastic. Have you tried the latest version of Topaz Photo AI… My son has been raving about it. I just tried the demo. I’m not ready to spend $200 yet!!
I have considered Topaz products but have never tried them. Given reviews, I believe Topaz is superior in many areas, but since buying Skylum products, I decided to stick with them.