This week, Egidio asks us to take another look at the photos we initially rejected. He writes, “So, this week’s challenge is all about rejected photos. A bad photo can sometimes be ‘rescued’ and made more presentable. Take a look again at a few of the photos you haven’t published yet and see what you can do to bring them out of the archives.” You can read his entire challenge post here. My response to Egidio’s challenge is a bit different; Lynn and I are currently in Tucson and my archive server is in Fargo. I’ve already learned that viewing and transferring files in Lightroom Classic over the Internet is painfully slow, and examining an archive from here is a study in frustration. I was able to find individual original files in the archive to help illustrate this post.
As a result, I’m examining photos I recovered and sharing the original, my original restoration, and, in some cases, a re-edit using modern masking and AI applications. The opening photo features an edit I completed specifically for this challenge. It’s a fitting place to begin, because it comes with a story of its own—the story of the old soldier.

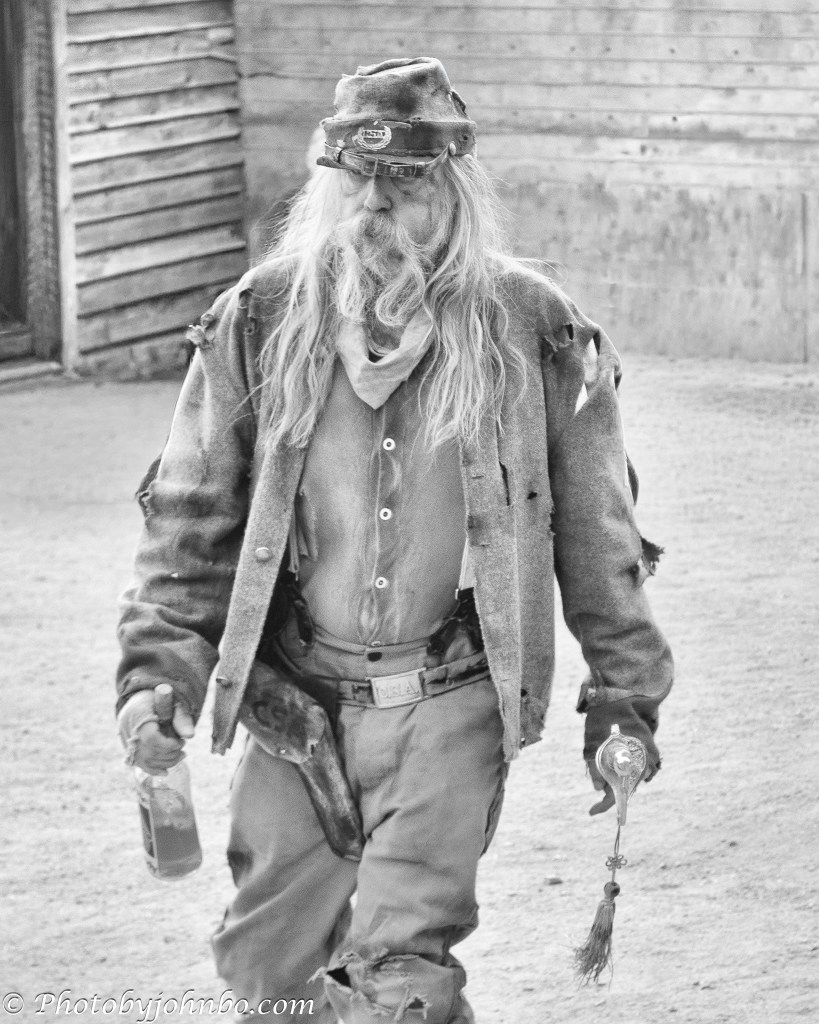
I featured a travel story about Goldfield, a recreated frontier town near Apache Junction, Arizona. I captured this image of a reenactor mid‑story, but rejected it for the post because the background crowd felt too distracting.

A couple of years ago, I recovered the image from my original archive for a Lens-Artists Challenge response on photographic film simulations, choosing it as the basis for a simulated daguerreotype. A daguerreotype, one of the earliest photographic processes, produced a single, highly detailed image on a polished silver‑coated copper plate with a mirror‑like surface and a faintly ghostly clarity. To remove the crowd that caused me to reject the photo in the first place, I used a manually applied mask and a tighter crop, then applied the tonal adjustments needed to echo the classic portrait style of the 1830s and 1840s.

For this week’s challenge, I re‑edited the photo by cropping it to a vertical format, using Photoshop 2026 to remove the crowds, and generative AI to rebuild the background. The result became a portrait of a man stitched together by history and slowly unraveling at the seams. The bottle in his hand, the pistol at his hip, and that stare that never quite meets the camera all contribute to the narrative.

On a trip to Washington, D.C. in 2007, we made our first visit to the Vietnam Veterans Memorial. I took this snapshot of the Vietnam Women’s Memorial with my Kodak Z812 IS point‑and‑shoot. I later found the entire series in my archives, but never wrote a blog post about that visit—my blog was still six years in the future.
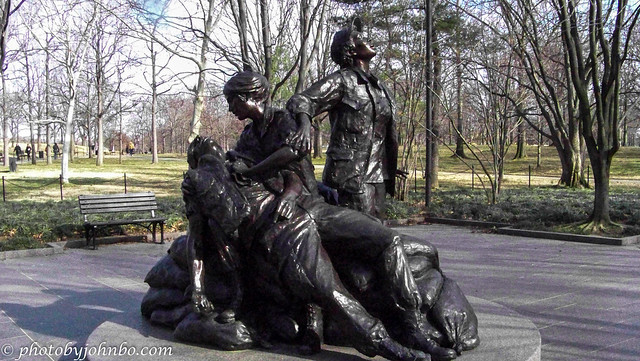
At some point, I edited this photo for the first time, adding detail to the background and boosting the contrast in the statues. Even so, the image still didn’t resonate with me, and it remained in the “rejected” bin.

In 2017, I experimented with Silver Efex and created what became my favorite version of this image, one I’ve used for black‑and‑white challenges. By tightening the crop to focus on the faces and converting it to monochrome, I uncovered a more poignant interpretation—still one of my favorite black‑and‑white edits to this day.

On a cruise in 2014, we visited a brothel museum in Skagway, Alaska, during one of our excursions. In one of the bedrooms, a hat and a feather boa were draped across an antique chair, with the red light in the window advertising the “services” offered in the room. I snapped the photo in automatic mode, forgetting that the camera would meter for the bright exterior, leaving the interior badly underexposed. The people visible on the street outside only added to the distractions that made me set the image aside.

My first recreation was a simple monocolor version made entirely in Lightroom Classic, with all the color sliders except red set to zero. That approach left a couple of artifacts I didn’t care for—the man’s hands stayed flesh‑colored, and a bright red glow reflected off the sheer curtain beside the bulb. For this 2026 reconstruction, I used Lightroom Classic’s Subject Masking tool to isolate the chair, hat, and boa and raise the exposure to bring out more detail, then added a brush mask to target the glass portion of the bulb. Inverting the masks preserved the subjects’ color, and setting the background mask’s saturation to zero completed the effect.

In 2017, we attended a rodeo in Buckeye, Arizona, where I brought my Nikon D500 and a Tamron 16–300mm f/3.5–6.3 zoom lens. I was a long way from the action, and the long focal length kept most of my shots at f/6.3, leaving the cluttered background sharper than I wanted. Fortunately, the D500’s resolution let me crop the image while still keeping more than 2,000 pixels on the long side, giving me plenty of latitude to isolate the subject. Its APS‑C sensor delivered enough detail for a strong crop, and I had the editing tools to make the most of the file—even without a fast f/2.8 super‑zoom or a full‑frame body.

For this, my favorite image in the sequence, I cropped tightly to feature the barrel racer. When I first edited it, there were no AI blur tools, but Luminar 4 offered a “mystical” effect that, with careful masking, helped soften the background. It worked reasonably well, though it required significant manual cleanup. Converting the image to monochrome further strengthened it, and readers responded warmly to that version. For this 2026 edit, I used subject masking to isolate the horse and rider. Lightroom masked them cleanly but ignored the barrel in the foreground, so I used the Add function to brush it into the selection. After inverting the mask, I applied Lightroom’s blur tool. It struggled with the background fencing, so I added a few extra brush masks to finish the job.

For the black‑and‑white version, I used DxO’s Silver Efex for the conversion, picked a preset that got me about 95% of the way there, and made a few small adjustments to contrast and highlights to make the image pop. Back in Adobe Lightroom Classic, I used brush masks to dial back the exposure on the bright white vehicle in the background. A final vignette helped further isolate the subject, resulting in a conversion that surpasses my original 2017 attempt, thanks to modern AI masking. To view the gallery of photos for this post in 2K HD, visit my Flickr album here.
There’s a faction of photographers who prefer to “edit in‑camera” and insist that any post‑processing is somehow “cheating,” that only “real” photographers shoot in manual mode and publish images straight out of the camera. As they say, to each their own.
Art, however, is what the artist makes of it. Early photographers spent long hours in the darkroom, shaping their prints under red light to strengthen tone, contrast, and narrative. Ansel Adams famously compared the negative to a “musical score” and the print to the “performance”—a philosophy shared in practice by Edward Weston, Dorothea Lange, and W. Eugene Smith. They all refined their images by hand; editing wasn’t cheating then, and it isn’t now. It’s part of the craft.
Thanks to Egidio for this week’s challenge. I would have had more to choose from if I’d had better access to my RAW archive, so I ended up re‑editing some of my favorite recoveries rather than digging for “new” rejects. It was far easier to revisit my more challenging edits in the published gallery than to sift through thousands of RAW files over a super‑slow VPN connection. Next week, Tina will host the challenge, which goes live at noon Eastern time on Saturday. Be sure to follow her here so you don’t miss it. If you’d like to create your own post in response and have questions about the process, here are the details.
John Steiner

I will start by saying bravo 😀 . The soldier is so good, I am impressed. The statue crop is great. I mainly do all my edits in Lightroom Classic. Maybe I should consider other tools also.
Thanks! I started with Photoshop Elements and Lightroom, but added the others because I never really learned all I could from those tools. My additions were all to make editing simpler for me, though I am sure I could have duplicated any of my edits with only Lightroom. I never spent the time to fully master the software. I can see by your examples that you have brought out your vision with only Lightroom.
whatever works 😉, and thanks again for your compliment
Very nice. A lovely demonstration of how desaturation can improve photos. And crops, of course
Thanks, I. J. I admit my penchant for black-and-white. Something about color can be distracting of the message, I think. I learned early on that cropping in-camera caused me to cut off subjects, things I didn’t see in the viewfinder didn’t register. I try to use a wider field of view and crop to the subject now.
I loved this post! For one thing, I completely agree with your remarks about editing as part of the creative process. And then your examples demonstrate this so well. The old soldier transformation is spot-on and the Vietnam Memorial is turned from a simple snapshot to a moving depiction of the tragedies of that war. Excellent stuff!
Thanks, Sarah! I struggled to find my originals on the remote server, but I enjoyed the re-edits (or as Ansel Adams would have said, additional performances.”) >grin<
Wonderful results from your editing skills. I completely agree with you. Editing is not cheating but a part of the creative process.
Thanks, Pepper! I am glad Egidio created this theme.
Me, too!
Wow John, what great editing. You clearly have the technical ability and the desire to jump in and finish your vision through editing. While I don’t do much editing because of lack of ability and patience, I admire your dedication and agree with you.
Thanks, Anne! This was a fun challenge, though I spent too many hours in front of the computer. I enjoyed every minute. >grin<
😎
Thank you , John, for sharing the creative process behind these images. Excellent editing skills. The old soldier is my favorite.
Thanks, Nes! The edit with the new tools brought out a story I hadn’t imagined when I started.
John, your edits are amazing as always. I love them all but the Old Soldier is my favorite.
Thanks, Beth! I really enjoy the process.
Terrific post John, loved the images and truly appreciated the detail you went into while explaining your edits. Some of the edits corrected items I’d never have noticed but having read about and revisited the images I can see the improvements and very much appreciate them! Great job on this one.
Thanks, Tina! Of course I obsess over small details to my detriment sometimes. >grin<
I've been known to re-edit a photo after it was posted to Flickr or even after the blog post went live and I noticed the issue.
Wow — these are all great. I just started using Lightroom and I an impressed and inspired by what I have seen from Lens-Artists The red hat and boa is inspiring because I was wanting to do something a little similar. I’ll keep trying. The old soldier was an interesting transformation. The last Vietnam memorial image might be my favorite.
Thanks! Lightroom is so much more powerful than when I first started using it.
Excellent examples, John. I think cropping can be one of the best tools for highlighting subjects. You’ve shown what that can do to an ordinary photo (to make is extraordinary).
Thanks, Vicki!
John, these examples are amazing. The photos you rescued are proof that post-processing is wonderful. I loved how you emphasized the important idea of filling the frame. The crops are perfect. The Vietnam Memorial photo is pure drama.
Thanks, Egidio! I’ve learned to shoot wide and tall to avoid missing the edges of the subject when I apply lens correction. Yet still, sometimes I forget and crop in-camera too close.
Beautiful collection of images and edits. The use of AI with the man walking, that’s a powerful shift in the image.
Thanks, Pamela! That kind of background change used to only be done by layering and a lot of tedious editing around the edges.
These are great edits – my faves are the soldier and the red hat photo.
Thanks, Nora!
These are all great, but I have to say I love the old guy, I like how you have taken it from the guy being part of a show to being part of history.
The power of today’s editing tools can’t be denied. Now, its up to us to use them responsibly. >grin<
Thanks, Leanne!
I love your closing thoughts, John, although sometimes I think I should, time allowing, to rely less on what I can achieve by editing. This challenge is perfect for you, you are a wizard and thank you so much for showing us how you edit.
Thanks for the kind words, Sofia! There are times when I spend too much time on an edit as well!